Here we'll show you how to prepare your text for laser cutting in Inkscape.
Do you like laser cut text? No problem. We'll teach you how to convert text to vector shapes and create reverse text bridges so your text comes out of the laser looking as awesome as you imagined.

Convert text to vector
This is easier than it sounds. You will select all of your text, go to the Path menu and click Object to Path or press CTRL+Shift+C. Your text should now be converted to a vector. At this point you should also see vector points or nodes around the edges of your letters.


Creating bridges for reverse laser cut text
If you were to cut out each letter individually, what you have here would be ready to go. However, if you want to change your font, you will lose the holes in your letters (O, P, B, A, etc.). You can fix this by creating links or bridges on the letters.
There are several ways to achieve this. We'll look at one method using the Boolean operations on the Path menu. Draw a rectangle with the Rectangle Tool (F4) where you want your bridge to be. In this example with the Laser logoMaster.bg we will place rectangles on all letters that need bridges.

Something to keep in mind when creating bridges for your text is the minimum size of the laser cut part. You will want your bridges to be at least 50% of the thickness of the material you are cutting. If you're cutting from 2mm aluminum, for example, you'll want your bridge and line dimensions to be 1mm.
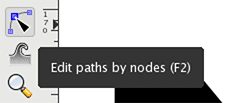
Now using the node path editor (F2) select one of the letters you want a bridge in and the rectangle you just made. Go to the Path menu again. This time choose Difference (Basil). This will cut the bottom object in the path of the top object. In other words, it will cut the rectangle out of your letter.
Repeat this process for any additional bridges you need in your text.


Your next step is to create the shape you want to cut the reverse text from. We will use a simple rectangle for this tutorial. Draw your rectangle around the text using the Rectangle Tool (F4).
You will want your rectangle to be below the letters for the next step. Select your rectangle, go to the Object menu and select Lower to Bottom (End).
.")
Using the node path edit tool (F2), select each letter and your rectangle. Now go back to the Path menu. This time choose Exclusion (Shutdown) (CTRL + ^). This will cut out the letters from the rectangle below.

. This will cut out the letters from the rectangle below.")
You can see the letters as they appear cut out of your rectangle/shape. Now you know how to prepare text for laser cutting in Inkscape!

Design Tips for Laser Cutting Parts
- The file must be in DXF format
- The file must not contain a drawing frame
- The file must not contain text boxes and sizing
- The loops must be closed
- The details should be according to ours design guidelines
- The tolerances should be according to the standard BDS EN ISO 9013-1 and BDS EN ISO 22768-m
- Each attachment should contain only one detail
- The scale of the details must be 1:1
- Mirror details to be created separately
Start your project today. Configure your laser cutting details now!
Save time and effort by getting an instant quote for your laser cut parts. Compare prices between different materials, thicknesses and quantities and make it easier for your team or customers to choose the right option according to the specific requirements.


